NIST 800-88 Proof: Backup Android Before Selling in 5 Quick Checks
September 1, 2026
Back up everything you want to keep, remove your Google and manufacturer accounts, pull the SIM and delete the eSIM, then factory reset and confirm the phone boots to a clean setup screen. Do those four things in that order and you protect your data and hand over a phone the buyer can actually activate.
TL;DR:
- Google Backup typically covers contacts, apps, settings, call history, and SMS, but photos and chat app data require separate backups for full data security.
- Removing all Google and manufacturer accounts, including eSIM profiles and any device-specific subscriptions, is crucial to prevent lockouts and ensure a clean handover.
- Performing a factory reset on an encrypted Android phone destroys encryption keys, making data recovery impossible for forensic tools, provided the device was encrypted from the start.
- Combining multiple backup methods, such as cloud backups and manual file transfers, minimizes data loss risk and confirms the backup’s completeness before resetting.
- Using professional services like BuyBackBear ensures data is securely wiped to industry standards and provides official proof of data erasure for peace of mind.
Table of Contents
- How Do You Back Up an Android Phone Before Selling?
- What About WhatsApp and Two-Factor Authenticator Apps?
- How Do You Remove Accounts So the Buyer Isn’t Locked Out?
- What Should You Do With the SIM, eSIM, and SD Card?
- How Do You Factory Reset and Confirm It Worked?
- Quick Verification Checklist and the Mistakes That Trip Up Sellers
- Don’t Forget Call Logs and Calendar Events
- Should You Cancel Carrier Services and Subscriptions First?
- Is There a Way to Erase Data Beyond a Standard Factory Reset?
- Why This Checklist Matters More Than It Looks
- The Faster Route: Selling Directly to BuyBackBear
- Sources
- FAQ
How Do You Back Up an Android Phone Before Selling?
Start with Google Backup, since it covers the widest range of data with the least effort. Open Settings → Google → Backup, then tap Back up now and wait for it to finish. This single backup typically pulls in your contacts, installed apps, app data, device settings, and call history, plus SMS messages on many phones. The official Google Support guidance confirms these are the categories covered and notes that restoring later requires knowing your Google Account credentials, so write those down before you go further.
Photos and videos need their own check. Open Google Photos, tap your profile icon, and look for “Backup complete” under Photos settings. The sync duration varies depending on your number of images and connection speed, so avoid rushing into a factory reset immediately after starting the backup. One popular thread on r/privacy makes exactly this point: sellers who reset too soon after starting a backup often lose the last batch of photos that hadn’t synced yet.
If you’d rather not rely purely on the cloud, plug the phone into a computer with a USB cable and manually copy the DCIM and Downloads folders. Samsung owners have a stronger option: Smart Switch handles photos, contacts, messages, and app data in one pass, and it’s generally more thorough than Google Backup alone for Galaxy devices.
Pro Tip: Before you wipe anything, restore one contact or reopen one backed-up photo on another device. A five-minute test beats finding out your backup was empty after the phone is already reset.
- Confirm the Google Backup timestamp under Settings → Google → Backup
- Check “Backup complete” status in Google Photos
- Copy DCIM/Downloads to a PC as a manual backup, or run Smart Switch on Samsung devices
What About WhatsApp and Two-Factor Authenticator Apps?
Google Backup does not automatically save everything. Chat apps and authenticator codes live in their own silos, and this is where most sellers lose data they actually cared about.
- WhatsApp: go to Settings → Chats → Chat backup → Back up to Google Drive, then confirm the account and check the timestamp before moving on. CashKR’s backup walkthrough flags this as one of the most commonly skipped steps sellers regret.
- Signal: Signal doesn’t lean on Google Drive by default; use its built-in device-to-device transfer feature when setting up your new phone, or export a secure backup file from within the app.
- Authenticator apps: Google Authenticator has a “Transfer accounts” option that generates a QR code for your new device; Microsoft Authenticator offers cloud backup tied to your Microsoft account; Authy backs up automatically once cloud backup is enabled in its settings.
Losing 2FA access is worse than losing photos, because account recovery for banking or email logins can take days of identity verification. If you skip this step and get locked out, your rescue plan is slow: most services make you prove identity through support tickets, not a quick app reinstall.
How Do You Remove Accounts So the Buyer Isn’t Locked Out?
Factory Reset Protection exists to stop thieves from wiping a stolen phone and reselling it, but it will just as easily lock out a legitimate buyer if you forget to remove your accounts first. This is the single most common reason resold Android phones get returned.
- Go to Settings → Accounts, select each Google account listed, and tap Remove account. Repeat until none remain.
- Remove manufacturer accounts too. Samsung owners need to sign out of Samsung account and disable Find My Mobile under Security and privacy, or the phone can stay locked to your Samsung ID even after a reset.
- Turn off Find My Device and any other device-finder feature before you touch screen locks.
- Leave screen locks and fingerprint or face data in place until every account is removed. Stripping biometrics first doesn’t disable FRP, it just makes your own phone less secure while you finish the checklist.
The Swappa seller checklist puts this order at the center of its guidance for good reason: verification only means something once accounts are gone. After the reset, the phone should reach the welcome screen with no prompt asking for your old Google credentials. If you see any credential prompt at that stage, an account removal was missed. You can find the exact removal path for every Android version in our guide to removing a Google account.
What Should You Do With the SIM, eSIM, and SD Card?
A physical SIM card comes out easily with the ejector tool that shipped with your phone, or a straightened paperclip. Keep it if you’re moving the number to a new device, or return it to your carrier if you’re canceling service entirely.
eSIM profiles are trickier because they’re software, not a removable chip, and they can persist even through a reset on some carriers. Go to Settings → Network & internet → SIMs, select the eSIM profile, and delete it. Call your carrier afterward if you plan to reuse that number, since some carriers need to release the profile on their end too. Our eSIM deletion walkthrough covers the manufacturer-specific menu paths, and Lumo’s guide to eSIM activation problems explains why buyers sometimes can’t activate a phone when a profile wasn’t properly cleared.
- Remove any microSD card. If it was set up as “adoptable storage” with internal encryption, don’t reformat it until you’ve backed up whatever’s on it.
- Check whether the phone is still tied to a carrier installment plan before you sell it.
How Do You Factory Reset and Confirm It Worked?
Once backups are confirmed and accounts are gone, go to Settings → System → Reset options → Erase all data (factory reset). On Samsung phones, the path is Settings → General management → Reset → Factory data reset.
Modern Android phones encrypt storage by default, so the reset doesn’t just delete file pointers, it destroys the encryption keys themselves. NIST’s media sanitization guidelines recognize this cryptographic erase as a legitimate purge method precisely because it makes the underlying data unreadable without ever touching the physical storage.

After the reset finishes, the phone should reboot straight into the first-run setup screen, language selection, Wi-Fi prompt, no request for your old account. Power it off once you’ve confirmed that, and it’s ready to ship.
Quick Verification Checklist and the Mistakes That Trip Up Sellers
Run through this before you box up the phone or hand it to a buyer in person:
- Google Backup timestamp is recent and matches today
- You restored or opened one item to confirm the backup actually works
- All Google and manufacturer accounts are removed
- eSIM profile deleted, physical SIM and SD card removed
- Phone boots to the setup screen with no account prompt
The mistakes that show up over and over: skipping the WhatsApp backup because it feels redundant with Google Backup, forgetting to export 2FA before wiping the authenticator app, leaving an eSIM active because it’s invisible without checking settings, and forgetting a Samsung account exists separately from a Google account.
Pro Tip: Cloud backups are your real safety net here. Forensic recovery tools can only pull data that hasn’t been cryptographically wiped, and testing on modern encrypted devices consistently shows that once a reset completes, there’s nothing left to recover from the device itself.
Don’t Forget Call Logs and Calendar Events
Contacts and photos get most of the attention, but call logs and calendar entries carry their own value, especially if you use your calendar for work scheduling or your call history for tracking client contacts.
Google Backup generally captures call logs alongside contacts on Android’s native dialer, but if you use a third-party phone or dialer app, check its own settings for a separate export or sync option. Calendar events sync automatically if you’re using Google Calendar tied to the account you backed up, but confirm this by opening calendar.google.com from a browser and checking that recent entries actually appear there, not just on the phone.
If you keep a personal calendar app that isn’t Google Calendar (some manufacturer default apps store events locally), you’ll need to either switch it to sync with your Google account before backing up, or export events manually as an.ics file through the app’s settings menu. This step is easy to skip because these data types feel minor compared to photos, but losing a year of contact history or a shared family calendar is a real inconvenience once the phone is already wiped.
Take five extra minutes here. It’s the cheapest insurance in the entire process, and it’s the kind of data you can’t casually recreate once it’s gone.
Should You Cancel Carrier Services and Subscriptions First?
Before you factory reset, check what’s actually tied to the device rather than to your phone number. Streaming subscriptions, cloud storage add-ons, and carrier insurance plans sometimes attach to a specific device’s IMEI, not just your account.
Call or check your carrier’s app for any device-specific services still active, like device protection plans or installment billing tied to that exact phone. If you’re switching your number to a new phone, this is also when you confirm the SIM or eSIM transfer with your carrier so service doesn’t lapse for either device. Carriers generally handle this over a quick call or through their app’s device management section.
If the phone was on a payment plan through the carrier rather than fully owned, selling it before the balance is paid off can create real complications, since some carriers won’t unlock a phone that still owes money. Check your account balance and device financing status before you list the phone anywhere.
Any app-based subscriptions tied to the device itself, rather than your Google or Apple account, should get canceled or transferred too. This mostly matters for niche apps that bind licenses to a device ID instead of an account login, which is rarer but worth a quick check if you use specialized software.
Is There a Way to Erase Data Beyond a Standard Factory Reset?
For most sellers, a standard factory reset on an encrypted phone is genuinely sufficient. But if you want extra assurance, particularly for a phone that held sensitive financial or medical information, there are a couple of extra steps worth taking.
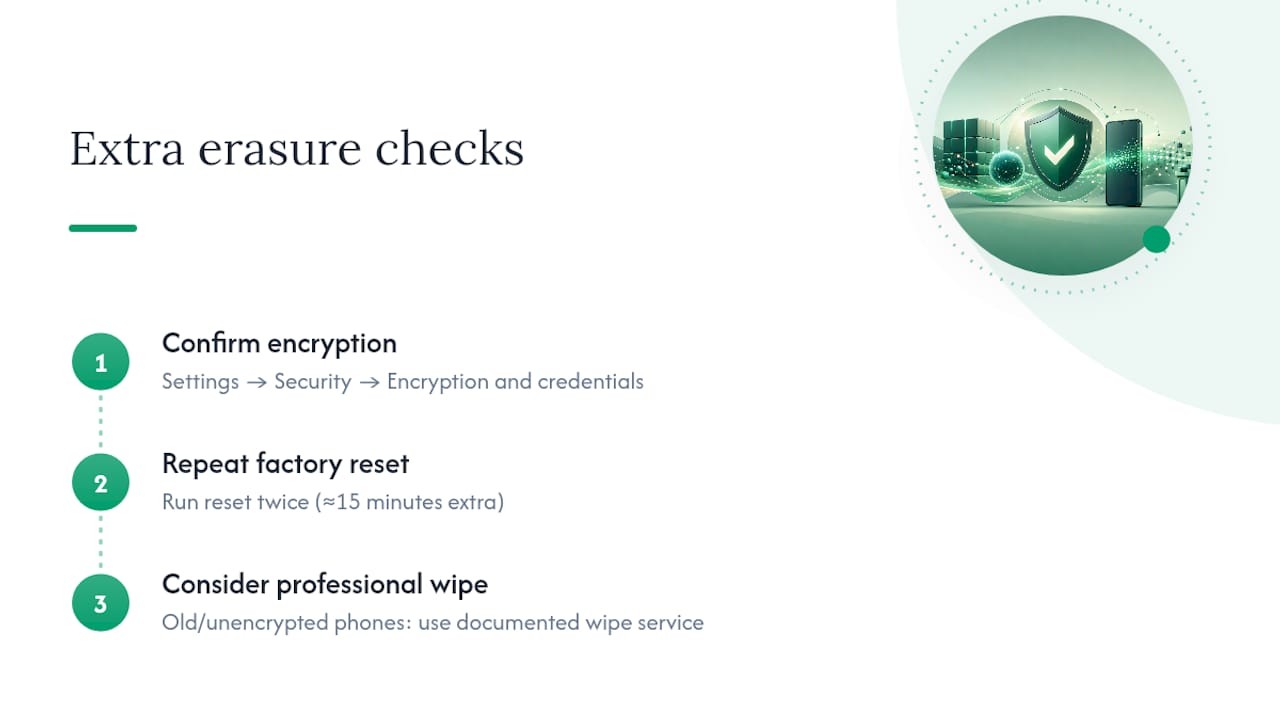
First, confirm encryption is actually active before you reset. Most Android phones ship encrypted by default since Android 10, but older devices or budget models sometimes shipped without it enabled. Check Settings → Security → Encryption and credentials to confirm.
Second, consider running the factory reset twice. This isn’t strictly necessary on a properly encrypted device, since the first reset already destroys the encryption keys, but it costs you fifteen minutes and adds a layer of certainty if you’re handing the phone to a stranger rather than a trade-in service you trust.
Third, know the limits of DIY erasure. Analysis of Android encryption and recovery tools shows that software recovery after a proper reset on an encrypted device is essentially a dead end, with the rare exception being very old or unencrypted hardware. If your phone falls into that older category, a factory reset alone leaves more theoretical risk, and a service that performs a documented wipe to a recognized standard closes that gap in a way a home reset can’t fully match.
Why This Checklist Matters More Than It Looks
A trusted checklist isn’t just about avoiding embarrassment. Skipped steps are what turn into buyer disputes, refund requests, and phones that come back because FRP locked someone out or a chat backup vanished. Following this order, backup first, app data second, accounts third, physical removal fourth, reset last, closes almost every gap sellers actually run into.
For sellers who’d rather skip the manual verification entirely, BuyBackBear wipes every device to the NIST 800-88 standard and issues a Certificate of Data Erasure with each transaction, which is the kind of documented proof a private buyer will never hand you.
, Andy
The Faster Route: Selling Directly to BuyBackBear
If working through six steps and a verification checklist sounds like more hassle than you want, BuyBackBear turns the entire process into four moves: get an instant online quote, ship the phone free with a prepaid label, let BuyBackBear inspect it and confirm the offer, then get paid the same day.
Every device that comes through gets wiped to the NIST 800-88 standard, and you get a free Certificate of Data Erasure as proof it happened, so you’re not relying on your own memory of whether you removed every account correctly. That certificate is the real advantage over a private sale: a stranger on a marketplace app never hands you documentation that your data is actually gone.
Selling privately can sometimes net a slightly higher price if you’re patient and comfortable meeting buyers, but it comes with more effort, more risk of a returned device, and zero proof of a secure wipe. If speed, certainty, and a same-day payout matter more than squeezing out the last few dollars, start a quote to sell your phone and let someone else handle the technical side. Businesses clearing out old inventory can use the same process through BuyBackBear’s business buyback program for bulk devices.
Sources
- Back up, sync, and restore data on Android - Google Support
- NIST Special Publication 800-88 Revision 2: Guidelines for Media Sanitization
- How to Wipe Your Device Before Selling – Swappa Blog
- How to Back Up Android Phone Before Selling: Full Guide 2026 - CashKR
FAQ
How Do I Completely Erase Everything From My Phone Before Selling It?
Back up everything you want to keep, remove all Google and manufacturer accounts to disable Factory Reset Protection, then run Settings → System → Reset options → Erase all data. Confirm the phone reboots to the setup screen with no account prompt before handing it over.
Can a Buyer Recover My Data After a Factory Reset?
On a modern encrypted Android phone, no. The reset destroys the encryption keys through cryptographic erase, and forensic testing on encrypted devices confirms there’s nothing left for recovery tools to pull once that’s done.
Can I Back Up My Entire Android Phone?
Google Backup covers contacts, apps, app data, settings, and SMS on many phones, but photos need Google Photos and chat apps like WhatsApp need their own in-app backup step. Combining all three gets you a genuinely complete backup, not just the default coverage.
Does Factory Reset Erase Everything on Android?
Yes, a factory reset wipes user data, apps, and settings from the phone’s storage, and on encrypted devices the underlying data becomes unreadable because the encryption keys are destroyed. It does not, however, remove an active eSIM profile in every case, which is why deleting that separately matters.
Does BuyBackBear Provide Proof That My Data Was Erased?
Yes. Every device BuyBackBear processes gets wiped to the NIST 800-88 standard and comes with a free Certificate of Data Erasure, giving sellers documented proof that goes beyond what a standard factory reset alone can show a buyer.
Recommended
Ready to sell?
Get an instant quote, free prepaid shipping, and fast cash that beats carrier trade-in credit.
Selling your device here, at a glance
Get my instant quote →- Instant quote in about 30 seconds, price locked while you decide
- Cash by PayPal, Zelle, Venmo or check after inspection, no fees
- Free prepaid label both ways, free return shipping if you decline
- We beat any competitor's written quote by $2
- Cracked screen, broken or won't power on? Still worth real money
- Certified NIST 800-88 data wipe with an emailed certificate
- Trade-in value paid in cash, not a 24-36 month carrier bill credit
- Every model priced: unlocked or carrier-locked, any storage size