NIST Aligned Data Sanitization Methods to Keep Resale Value
September 8, 2026
The right method depends entirely on where the device is going next. Use Clear (overwrite) for devices staying inside your organization, Purge (firmware secure erase or cryptographic erase) for anything leaving your control or holding sensitive data, and Destroy for failed drives or classified material that can never risk recovery. NIST SP 800-88 Rev. 2 sets this framework, but the method only counts if you verify it and get a certificate proving it happened.
TL;DR:
- Using Clear, Purge, or Destroy depends on the device’s next use and requires verified proof for each method; overkill or under-sanitization can lead to security or resale value loss.
- SSDs and NVMe drives cannot be reliably sanitized with overwriting due to firmware-level wear leveling; firmware commands like Secure Erase or Sanitize are the proper Purge methods.
- Degaussing is effective for HDDs and magnetic tapes if verified against coercivity, but optical media require physical destruction, typically shredding or incineration, for proper sanitization.
- Proper verification involves checking firmware command responses, performing sample readbacks, or obtaining destruction certificates; skipping this step risks false claims of sanitization.
- Regular factory resets may not fully sanitize data unless encryption keys are destroyed first; always verify the reset’s impact on data security, especially on unencrypted devices.
Table of Contents
- What Do Clear, Purge, and Destroy Actually Mean?
- Which Sanitization Method Fits Your Storage Media?
- How Do You Choose the Right Sanitization Method?
- What Tools and Commands Actually Verify Sanitization?
- When and How Should You Physically Destroy Media?
- What Mistakes Do People Make When Sanitizing Data?
- What Compliance Requirements Apply in Healthcare and Finance?
- What Sanitization Looks Like at Buybackbear’s Scale
- Should You Sanitize It Yourself or Let a Buyback Service Handle It?
- Sources
- FAQ
What Do Clear, Purge, and Destroy Actually Mean?
NIST’s three tiers aren’t arbitrary labels. Each one is built around a specific attacker profile, and picking the wrong tier means you’re either wasting money or leaving a door open.
Clear defeats simple, non-invasive recovery attempts, the kind anyone could run with free undelete software. A verified overwrite of the addressable storage space handles this. It’s the right call for a laptop moving from one employee’s desk to another’s inside the same company.
Purge defeats a much more capable adversary, someone with lab equipment and technical skill trying to recover data through advanced, non-destructive means. This is where firmware-level commands take over: ATA Secure Erase, NVMe Sanitize, or cryptographic erase on a self-encrypting drive. Purge is the level you want the moment a device leaves your organization’s physical control, whether that’s a trade-in, a resale, or a donation.
Destroy assumes the attacker has lab-grade tools and unlimited time, and it eliminates the possibility of recovery by physically ruining the media. This tier exists for drives that fail firmware commands, media holding classified or extremely high-sensitivity data, or devices too old or damaged to sanitize any other way.
The Rev. 2 update from September 2025 matters because storage itself changed faster than the guidance did. Older SP 800-88 language leaned heavily on overwriting, written for spinning platters where every sector maps directly to a physical location. Flash storage doesn’t work that way. NVMe drives, SATA SSDs, and self-encrypting drives all manage data through firmware layers that hide wear-leveling, over-provisioning, and bad-block remapping from the operating system. Rev. 2 formally recognizes that overwriting can’t reliably reach every physical cell on these devices, and it elevates firmware-native commands and cryptographic erase to primary Purge methods rather than treating them as a footnote.
That shift has a real cost consequence. Choosing Destroy when Purge would satisfy your risk profile means throwing away resale value for no security benefit. Choosing Clear when Purge was required means a device leaves your hands with data still technically recoverable.
Quick reference for what defeats what:
- Clear stops casual or accidental recovery attempts (deleted-file scanners, basic forensic tools).
- Purge stops laboratory-grade recovery attempts, including chip-off forensics on flash memory.
- Destroy removes the storage medium from existence as a readable object.
- All three require verification; none of them are “trust but don’t check.”
One insight from the standard’s own logic is worth remembering: match the sanitization level to what happens to the device next, not to how nervous you feel about the data. A phone going to a certified buyback program that will document a Purge-level wipe doesn’t need the same treatment as a hard drive containing unencrypted patient records that’s headed to a landfill contractor with no chain of custody. Overkill wastes resale value; underbill creates liability. The SNIA industry guidance frames this as matching the sanitization decision to storage architecture and threat model together, not either one alone.
Which Sanitization Method Fits Your Storage Media?
Here’s where most guidance falls apart: it treats sanitization as one generic process instead of a set of decisions that depend heavily on the physical media in your hand.
Hard disk drives (HDDs)
Traditional spinning drives are the easiest case, and also the one where outdated advice lingers longest. A verified overwrite, writing a fixed pattern like all zeros or pseudorandom data across the device’s addressable sector space, meets the Clear standard on modern HDDs. This directly contradicts the old “three-pass” or “seven-pass” wipe folklore still floating around IT forums; NIST SP 800-88 Rev. 2 states one pass suffices for Clear-level sanitization on current-generation platters.
For Purge, use the drive’s built-in ATA Secure Erase command, which works below the operating system and hits sectors the OS can’t normally address, including reallocated bad sectors. Degaussing is the other Purge option for HDDs, but only when the equipment’s field strength exceeds the media’s coercivity rating, which can be significant depending on drive generation. A degausser that isn’t calibrated and verified against the specific drive’s coercivity spec is just an expensive way to feel like you did something.
SSDs: SATA and NVMe
This is where overwriting quietly fails and almost nobody notices. SSDs use wear leveling and over-provisioning, meaning the physical cells the drive actually writes to don’t correspond one-to-one with the logical addresses your overwrite command targets. A chunk of your “erased” data can sit untouched in reserve cells the OS never sees. Overwriting an SSD is not a reliable sanitization method for this exact reason.
The fix is to let the drive’s own firmware do the work. On SATA SSDs, that’s ATA Secure Erase, issued at the hardware level so the drive purges every cell it manages, visible or hidden. On NVMe drives, use the NVMe Sanitize command, which offers a Block Erase or Crypto Erase mode built directly into the NVMe specification. Both count as Purge under Rev. 2 when executed successfully and confirmed.
Confirmation matters more here than with HDDs, because SSD firmware occasionally reports success even when a command partially failed. Always check the drive’s status register or exit code after the command completes, and where possible, do a spot readback across several logical block addresses to confirm the data pattern actually changed.
Self-encrypting drives (SEDs)
SEDs flip the sanitization problem on its head. Instead of erasing the data, you destroy the encryption key that makes the data readable. Cryptographic erase can sanitize an entire drive in seconds, which is dramatically faster than any overwrite process, and it counts as a legitimate Purge method, but only under specific conditions.
The encryption has to cover all user data on the drive from the moment of first write, not just a partition added later. And you need proof the key was actually destroyed, not just reset or rotated. Most enterprise SED implementations log a key-destruction event with a timestamp; ask for that log as your verification artifact. Without it, you have no way to demonstrate the drive isn’t still readable with a recovered key.
Tapes, optical media, and mobile devices
Magnetic tape follows HDD logic for Purge: degaussing at the correct field strength, verified against the tape’s coercivity. Overwriting tape sequentially is technically possible but slow and rarely worth it compared to degaussing.
Optical media (CDs, DVDs, Blu-ray) can’t be cryptographically erased or overwritten in any meaningful sense, since data is burned into the physical layer. Destroy is effectively the only real option: shredding designed for optical media, or incineration.
Mobile devices deserve their own caution, because a factory reset alone is often mistaken for full sanitization. On modern phones with full-disk encryption enabled by default, a proper factory reset that includes a cryptographic key wipe can meet Purge, but only if encryption was active before the reset and the reset process actually destroys the key rather than just clearing app data. Checking that assumption is exactly where a lot of secondhand phones and trade-in devices go wrong.
How Do You Choose the Right Sanitization Method?
Skip the guesswork by walking through the decision in order rather than picking a method first and justifying it after.
- Classify the data by sensitivity. Public information needs nothing beyond basic deletion. Internal business data typically warrants Clear. Confidential data, financial records, health information, employee records, calls for Purge at minimum. Restricted or Controlled Unclassified Information (CUI) usually demands Purge and sometimes Destroy, depending on your organization’s specific policy.
- Check whether the device still works. A drive that responds normally to firmware commands opens up Purge options like Secure Erase or Sanitize. A drive that’s dead, unresponsive, or throwing hardware errors takes Destroy off the table as an option and puts it on the table as the only choice, since you can’t run software-based sanitization on hardware that won’t take commands.
- Weigh resale value against destruction cost. A working laptop with intact SSD is worth real money on the secondary market; sending it to a shredder because “it’s safer” throws that value away for no additional security once a proper Purge is complete and verified.
- Run verification specific to the method used. Firmware exit codes for secure erase commands, sample readback for overwrites, a documented destruction certificate for anything physically destroyed.
- Generate documentation before the device leaves your hands. A certificate of erasure or destruction should list the device serial number, method used, date, and confirmation of successful verification. Stanford’s IT security guidance treats this documentation step as a standard part of campus device disposal, not an optional add-on.
Pro Tip: Keep sanitization certificates for at least as long as your data retention policy requires for the underlying data itself, not just for the hardware. If the records that were on the drive needed to be retained for seven years, your proof that you destroyed them should outlive that same window.
What Tools and Commands Actually Verify Sanitization?
Knowing which command to run matters less than knowing how to confirm it worked. Plenty of sanitization failures happen not because the wrong method was chosen, but because nobody checked the result.
On Linux systems, hdparm --security-erase triggers ATA Secure Erase on SATA drives directly from the command line, and it returns an exit status you should always check rather than assume. For NVMe drives, nvme-cli’s sanitize subcommand issues the NVMe Sanitize command, and nvme sanitize-log pulls the sanitize log page afterward, which is your actual proof the operation completed rather than just started. Vendor utilities from drive manufacturers often wrap these same underlying commands in a friendlier interface and add drive-specific diagnostics worth using when available.
Verification isn’t one-size-fits-all across methods:
- Firmware secure erase and Sanitize commands: check the completion status code and sanitize log page, not just “no error returned.”
- Overwrite-based Clear: sample multiple logical block addresses after the pass and confirm the pattern actually changed.
- Cryptographic erase: request the key-destruction log with its timestamp; without it, there’s no way to prove the key is actually gone.
- Physical destruction: the only acceptable proof is a vendor-issued certificate documenting method and, where relevant, particle size.
Verification requirements aren’t cosmetic; method-specific checks, whether firmware codes, readback samples, or destruction certificates, are what separates a sanitization claim from a sanitization fact. Open-source tools like DBAN handle basic overwrite-based Clear for older HDDs reasonably well, though it has no meaningful answer for SSDs. Commercial erasure software with audit logging tends to be worth the license fee once you’re sanitizing more than a handful of drives a year, mainly because it generates the documentation automatically instead of leaving you to build a paper trail by hand. For anyone managing volume, a certificate of erasure that ties a specific device serial number to a specific verified method is the difference between a policy and proof.
When and How Should You Physically Destroy Media?
Destruction sounds simple until you look at what actually qualifies. Approved methods include melting, incineration, and disintegration to a verified particle size, and the standards behind these methods got stricter, not looser, over recent years.
The reason matters: shredding and pulverizing, long treated as the gold standard for paranoid IT departments, aren’t automatically sufficient anymore for the highest data classifications. Industry guidance now notes that shred output can still leave particles large enough to contain reconstructable fragments of flash memory, especially with SSDs where data density means even small chips carry meaningful information. Modern guidance for classified or highest-sensitivity material favors melting or incineration with verified particle-size compliance, often down to specifications like 2mm, over shredding alone.
What to require from a destruction vendor before you hand over a single drive:
- A written particle-size specification for the destruction method used, not just “shredded.”
- A certificate naming the device serial numbers processed, the date, and the method.
- Documentation of chain of custody from pickup to destruction, closing any gap where drives could theoretically be diverted.
- Confirmation of environmental compliance for material recovery, since destroyed electronics still contain metals and components subject to e-waste regulations.
When drives are physically damaged or unresponsive to firmware commands, destruction stops being a choice and becomes the only reliable path, and that’s precisely when a documented, verified vendor matters most.
What Mistakes Do People Make When Sanitizing Data?
The multi-pass overwrite myth refuses to die. It comes from a 1996 paper about older, lower-density magnetic media, and it got repeated in IT training materials for two decades after the underlying drive technology it was based on stopped being relevant. On today’s HDDs, a single verified overwrite pass meets Clear; running seven passes doesn’t add security, it just burns hours you didn’t need to spend.
Factory reset gets treated as a universal sanitization method, and it isn’t one. On an encrypted phone where the reset genuinely destroys the encryption key, it can meet Purge. On an older device without encryption enabled, or on Android devices where encryption status varies by manufacturer and OS version, a factory reset can leave recoverable data sitting on the physical storage even though the interface shows a blank device.
The biggest mistake, though, is skipping verification entirely and handing off a device on faith. A wiped device with no certificate is a claim, not a fact, and claims don’t hold up in an audit or a breach investigation.
- Multi-pass overwriting on modern HDDs wastes time without adding security.
- Overwriting an SSD instead of using firmware-level Purge commands leaves data in over-provisioned cells.
- Trusting factory reset on unencrypted or partially encrypted devices as a substitute for verified Purge.
- Skipping documentation, leaving no proof a sanitization method was ever run successfully.
Pro Tip: If you inherited a fleet of devices with unknown sanitization history, treat every one of them as unsanitized until you personally verify otherwise. Assuming the last person did it right is how sensitive data ends up on a resale marketplace.
What Compliance Requirements Apply in Healthcare and Finance?
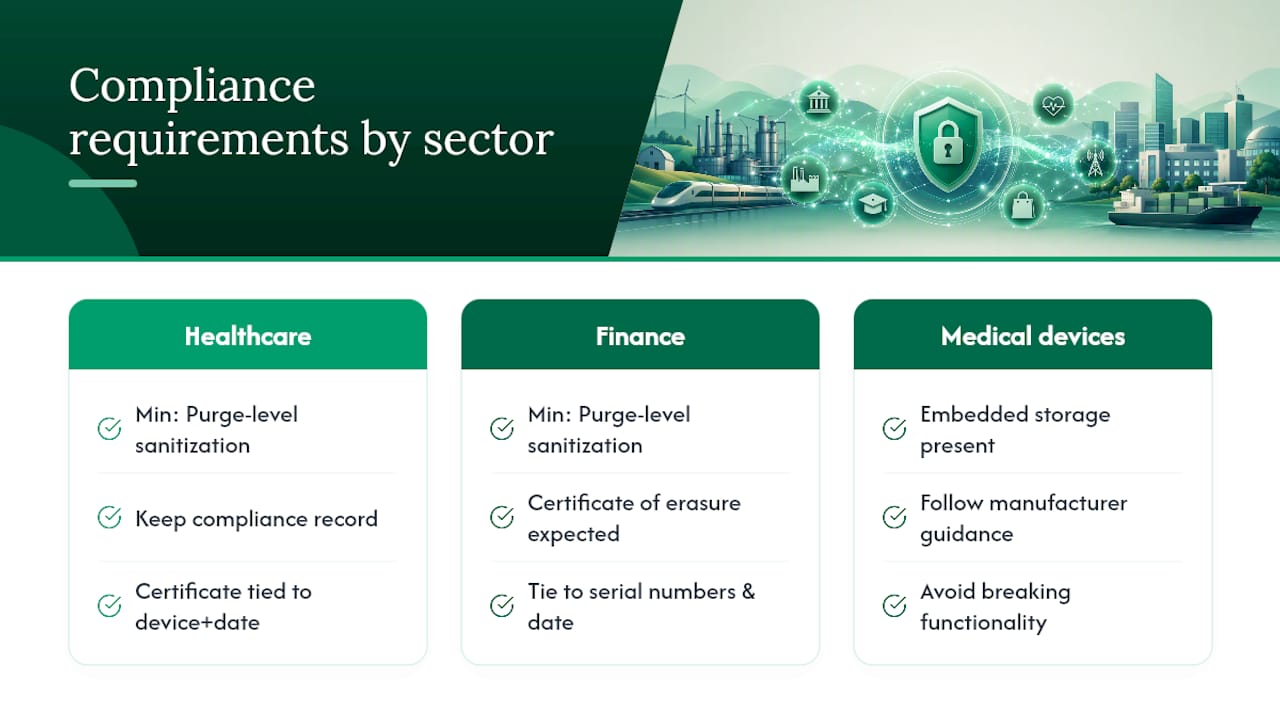
Regulated industries don’t get to choose sanitization levels casually, because the underlying data categories carry legal weight beyond ordinary business risk. Healthcare organizations handling protected health information under HIPAA generally need Purge-level sanitization at minimum for any device that stored patient records, with documentation retained as part of the broader compliance record, not just as an IT convenience.
Financial institutions face a similar bar under regulations like GLBA, where customer financial data triggers the same Purge-or-higher expectation, and examiners increasingly expect to see a certificate of erasure tied to specific device serial numbers during audits rather than a general policy statement.
Medical devices themselves add another layer of complexity, since many contain embedded storage that holds patient data alongside firmware, and sanitizing that storage without breaking device functionality requires manufacturer-specific guidance. Organizations retiring networked medical equipment should consult medical device cybersecurity compliance guidance before assuming a standard IT sanitization procedure applies cleanly.
The common thread across both industries: the sanitization method itself often mirrors what any organization would use for confidential data, but the documentation burden is heavier. Regulators want proof that ties a specific method to a specific device and a specific date, not a general assurance that “IT handled it.”
What Sanitization Looks Like at Buybackbear’s Scale
Every device that comes through Buybackbear gets wiped to the NIST 800-88 standard before it’s resold or recycled, which means applying exactly the media-specific logic covered above across phones, tablets, laptops, and wearables at volume rather than one device at a time.
That volume is where the theory in this article turns into an operational problem. A phone needs a different sanitization approach than a laptop’s SSD, which needs a different approach than an older device with a spinning drive, and getting that wrong at scale means either wasted resale value or genuine data risk repeated across hundreds of units instead of one. Buybackbear issues a free Certificate of Data Erasure for every device processed, giving sellers, whether an individual clearing out a drawer or a business retiring a fleet, the documented proof that regulators and auditors actually want to see.
Devices that can’t be resold don’t get shredded and forgotten. Buybackbear routes them through responsible recycling instead, which keeps the environmental side of disposal aligned with the same standards governing the data side.
, Andy
Should You Sanitize It Yourself or Let a Buyback Service Handle It?
DIY sanitization makes sense for a single drive when you have the time, the right commands, and the patience to document everything yourself. It stops making sense the moment you’re dealing with more than a few devices, or when a compliance requirement demands a formal certificate you can defend in an audit.
Buybackbear handles both problems at once. The flow starts with an instant online quote, followed by free prepaid shipping so the device gets to inspection without any upfront cost. Once it arrives, Buybackbear inspects the device, confirms the offer, and runs a certified NIST 800-88 wipe, generating a Certificate of Data Erasure automatically rather than leaving that step to chance. Payment lands the same day the inspection confirms the offer, sent by PayPal, Venmo, debit card, or bank transfer, with no contract locking you into anything.
| Approach | Best for | Trade-off |
|---|---|---|
| DIY sanitization | Single device, technical comfort, no urgency | Time cost, self-generated documentation |
| Buybackbear buyback | Any volume, compliance need, wants cash back | Requires shipping the device out |
For a single phone or laptop trade-in, that means skipping the command-line work entirely while still getting audit-ready proof. For businesses retiring a fleet of laptops or phones, the same process scales without requiring anyone in-house to become an expert in NVMe Sanitize commands or degausser calibration. Start with an instant quote and see what your devices are worth before they sit in a drawer collecting risk instead of cash.
Sources
For the technical detail this article compresses into practical steps, the primary source is NIST SP 800-88 Rev. 2, including its full PDF appendices covering media-specific minimums. SNIA’s media sanitization guidance adds practical detail on destruction methods and verification concerns that NIST leaves more general. Stanford’s IT security office publishes a real-world example of how a large institution applies the Clear/Purge/Destroy framework to campus hardware.
- NIST Special Publication 800-88 Rev. 2: Guidelines for Media Sanitization
- NIST SP 800-88 Rev. 2 (full PDF)
- Media Sanitization (SNIA / industry guidance)
- NIST 800-88 explained: The modern standard for data erasure | DriveWipe
FAQ
What Is the Best Tool for Data Sanitization?
There’s no single best tool; the right one depends on the media. hdparm handles ATA Secure Erase for SATA drives, nvme-cli handles NVMe Sanitize, and cryptographic erase requires the drive’s own SED management software rather than a generic utility.
What Do NIST Standards Actually Require for Sanitization?
NIST SP 800-88 Rev. 2 requires matching one of three levels, Clear, Purge, or Destroy, to the data’s sensitivity and the device’s destination, plus mandatory verification and documentation for every method used.
What Are the Two Main Types of Sanitization Methods?
The two broad categories are logical sanitization, overwriting or cryptographic erase performed through software or firmware commands, and physical destruction, which renders the media permanently unreadable through methods like shredding, melting, or incineration.
What Are the Basic Steps for Sanitizing a Device Properly?
Classify the data’s sensitivity, confirm the device is operable, select Clear, Purge, or Destroy based on that classification and the device’s destination, execute the method-appropriate command or process, verify the result, and generate a certificate documenting everything.
Does a Factory Reset Count as Data Sanitization?
Only sometimes. A factory reset can meet Purge on a device with full-disk encryption enabled before the reset, since it destroys the encryption key, but it’s unreliable on unencrypted devices where the underlying data can remain physically recoverable.
Recommended
Ready to sell?
Get an instant quote, free prepaid shipping, and fast cash that beats carrier trade-in credit.
Selling your device here, at a glance
Get my instant quote →- Instant quote in about 30 seconds, price locked while you decide
- Cash by PayPal, Zelle, Venmo or check after inspection, no fees
- Free prepaid label both ways, free return shipping if you decline
- We beat any competitor's written quote by $2
- Cracked screen, broken or won't power on? Still worth real money
- Certified NIST 800-88 data wipe with an emailed certificate
- Trade-in value paid in cash, not a 24-36 month carrier bill credit
- Every model priced: unlocked or carrier-locked, any storage size